Vinyl flooring offers durability and cost-effectiveness, making it a popular choice in residential and commercial spaces. However, poor installation can lead to unsightly issues or compromised performance. Knowing how to spot errors and fix them ensures the flooring stays resilient and secure. This article discusses the common signs of a bad vinyl flooring installation, what causes them, and steps for restoring the floor’s original condition. By understanding these indicators and their solutions, anyone can maintain a beautiful, long-lasting vinyl surface.
Understanding Vinyl Flooring
Vinyl flooring is typically made from several layers, including a protective topcoat, a design layer, and a base layer. Depending on the manufacturing process, vinyl can be printed or inlaid. A quality vinyl floor features good wear resistance and moisture protection. It is known for withstanding high foot traffic, pet activity, and frequent cleaning.
There are two main types of vinyl flooring: sheet vinyl and luxury vinyl tiles or planks. Sheet vinyl is cut to size from large rolls, while luxury vinyl often comes in tile-like or plank-like forms. Both types rely on proper installation techniques to ensure an even, secure, and visually appealing surface.
Key Signs Of A Poor Installation
Bubbling, Buckling, Or Curling Edges
One of the most noticeable signs of bad vinyl flooring installation is the appearance of bubbles or raised areas on the surface. These air pockets occur when the adhesive fails to bond properly or traps moisture underneath. Buckling or curling edges usually indicate excessive tension or shrinkage.
Improper layout or failure to flatten the flooring before installation can contribute to these issues. In many cases, insufficient acclimation time before installation leads to expansion or contraction in the floor once exposed to normal room temperatures.
Gaps And Seams
Gaps between vinyl planks or open seams in sheet vinyl can be both unsightly and problematic. They often signal that the installer did not align edges correctly or neglected to stagger the planks as recommended. Excessive expansion or contraction can also create noticeable lines or seams.
Gaps and seams can trap debris, collect moisture, and allow bacteria to grow. Over time, these factors degrade the floor’s structural integrity, potentially causing more significant damage and requiring costly repairs.
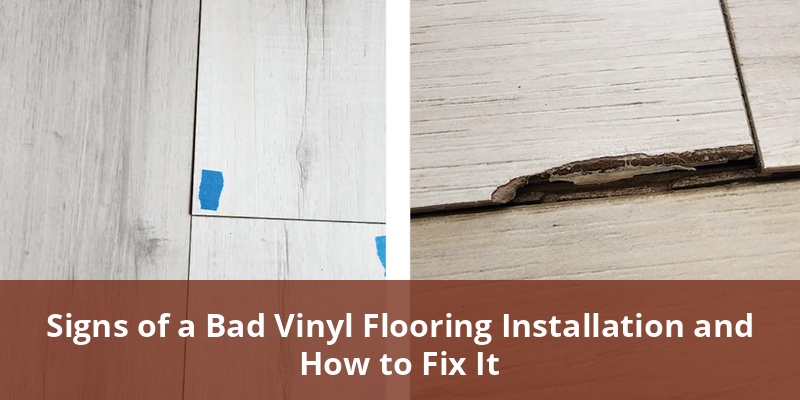
Peeling Or Loose Tiles
When individual vinyl tiles or planks peel away from the subfloor, it indicates that the adhesive bond is weak. Improper use of glue, inadequate pressure during installation, or exposure to excessive heat can cause vinyl sections to come loose. Subfloor contaminants can further compromise the bond.
If left unaddressed, the peeling areas can spread, especially in high-traffic zones. This condition not only looks unappealing but also poses a tripping hazard, making timely repairs essential.
Uneven Or Bumpy Surface
A well-installed vinyl surface should be smooth and level. Any visible bumps or depressions often point to an uneven subfloor or debris trapped underneath the vinyl layers. Contractors who skip proper preparation may install vinyl over cracks or poorly patched holes.
Eventually, these imperfections put pressure on the vinyl and lead to premature wear. Such complications can limit the floor’s longevity and compromise its overall appearance.
Misaligned Patterns
Vinyl sheets or tiles often feature designs that must be aligned for a seamless look. If the pattern appears crooked, offset, or mismatched, it means there was an error during layout and cutting. Not matching the pattern from one sheet or plank to another can severely impact visual appeal.
This issue also suggests that the installer did not measure and mark sheets accurately, possibly due to haste or inexperience. Correcting misaligned patterns may be challenging, but it can be addressed by removing and reinstalling incorrectly laid sections.
Common Causes And Mistakes
Faulty vinyl flooring installations typically stem from a handful of mistakes. Some involve the subfloor, while others relate to the installation process itself. Identifying these underlying causes is vital to prevent repeated problems.
- Dust Or Debris On The Subfloor: Dirt, dust, or other foreign particles can hinder proper adhesive bonding.
- Excessive Moisture: High humidity or water trapped under the vinyl can lead to expansion, creating bubbles or warped edges.
- Inadequate Preparation: Failing to level and clean the subfloor can leave holes, ridges, or rough spots under the vinyl.
- Wrong Adhesive Selection: Using the wrong glue or spreading uneven amounts can compromise the floor’s adherence.
- Rushed Acclimation: Vinyl requires time to adjust to the room’s temperature and humidity before installation.
How To Fix Bad Vinyl Flooring
Addressing installation flaws often involves removing the damaged sections, repairing the subfloor, and reapplying adhesive or replacement materials. The approach varies depending on the specific issue and the type of vinyl flooring installed.
1. Flattening Bubbles And Repairing Buckles
First, carefully heat the affected area using a hairdryer to loosen the adhesive and soften the vinyl. Then, use a rolling pin or heavy tool to press the bubble out and remove any trapped air. If the adhesive is weak, inject fresh glue under the vinyl using a syringe. Firmly press the vinyl back into place and wipe away excess adhesive.
For buckled sections, gently lift the vinyl and ensure the subfloor is level. Apply appropriate adhesive and press the material back down while ensuring no wrinkles remain. Use a floor roller or heavy object to promote even adhesion.
2. Sealing Gaps And Seams
When filling gaps between vinyl planks, obtain a vinyl seam filler or resilient caulk designed for flooring. Apply a small amount into the gap, removing any surplus with a damp cloth. Press the planks closer together if possible, then let the filler cure fully before walking on the area.
For sheet vinyl seams, consider using a vinyl seam sealer kit. These kits often include a bonding agent that chemically fuses the vinyl edges. A small brush or applicator helps deliver the sealer precisely along the seam. Place a flat object on top until the seam dries.
3. Re-Adhering Loose Tiles
Start by gently prying up the loose tile or plank using a putty knife. Clean any old adhesive or debris from the subfloor and the underside of the vinyl. Apply a new coat of adhesive designed for vinyl flooring, following the manufacturer’s instructions on drying time.
Press the vinyl tile firmly into position. Weigh it down with a heavy object—like a stack of books—to enhance bonding as it dries. Once cured, confirm the tile is secure by gently trying to lift the edges.
4. Leveling An Uneven Surface
In cases of bumps or indentations, it may be necessary to remove the vinyl in those sections to access the subfloor. Use a leveling compound to fix ridges or dips, carefully following the product guidelines for application thickness and drying time. Sand away any rough spots and remove residue before reinstalling the vinyl.
When debris is the cause, simply peel back the vinyl (or remove it in tile form), vacuum the area, and gently wipe it clean. Double-check the subfloor for further imperfections, then lay the vinyl back down using fresh adhesive if needed.
5. Correcting Pattern Mismatch
If the pattern is severely misaligned, removing large sections may be the only solution. Carefully mark and cut out the affected area, aligning a new piece of vinyl to the existing pattern. Measure thoroughly and allow a small overlap, then trim for an exact match.
Use a seam sealer or double-sided vinyl tape for a neat, secure result. Patience is key when aligning corners and motifs so that the design flows cohesively across different pieces.
Maintenance And Prevention
Implementing some straightforward strategies keeps vinyl floors free from recurring issues. Regular care and routine checks minimize the likelihood of moisture damage, loose edges, or wear spots.
- Clean Properly: Sweep and mop regularly to remove dirt, grime, and abrasive particles that can damage seams.
- Avoid Excess Water: Too much water during cleaning can seep into edges or seams, weakening the adhesive.
- Use Recommended Adhesives: Align the product choice with the manufacturer’s recommendations for the vinyl type.
- Check For Moisture Issues: In high-humidity environments, use a dehumidifier or install vapor barriers to protect the subfloor.
- Monitor Traffic Flow: Place floor mats in high-traffic zones and at entrances to limit wear and tear.
Estimating Repair Costs And Materials
The cost involved in repairing a bad vinyl floor installation depends on the extent of the damage and whether professional help is required. Minor fixes like sealing small gaps or re-adhering loose corners may only require low-cost supplies. More complex fixes could involve extensive subfloor repairs or replacing large sections of flooring.
| Repair Type | Approximate Cost Range | Additional Notes |
|---|---|---|
| Minor Bubble Removal | $20 – $50 | Includes adhesives, syringes, roller tools |
| Seam Sealing | $30 – $80 | Seam sealer kits or professional-grade fillers |
| Tile Replacement | $40 – $100 | Depends on tile type, adhesive, area size |
| Subfloor Repair | $100 – $300+ | Involves leveling compounds or partial board replacement |
Routine maintenance remains the best strategy to reduce high repair bills. Address small issues early to avoid pricier interventions later.
Final Thoughts
Recognizing signs of a bad vinyl flooring installation—from buckling and bubbles to mismatched patterns—is essential for addressing problems before they escalate. Proper repairs often involve skillful heating, leveling, or re-adhesion. Routine maintenance, protective mats, and using the correct adhesives can prevent many of these defects in the first place. By taking a proactive approach and resolving installation flaws early, vinyl floors can maintain their visual appeal, comfort, and functionality for years to come. For more complex restorations, seeking professional advice or services ensures a polished and durable finish.